Mike's Home Inspector BlogMichael Burfitt |

|
As a home inspector, I understand the paramount importance of fire safety in homes. With this week being Fire Prevention Week across North America, it's the perfect time to emphasize the significance of fire prevention and preparedness. This annual event serves as a reminder that taking proactive steps to prevent fires is crucial in safeguarding your family and property.
Why Fire Prevention Matters Each year, fire-related incidents claim lives, cause injuries, and result in substantial property damage. Many of these tragedies can be prevented through awareness and action. Fire Prevention Week aims to educate homeowners and renters alike on fire safety practices that can make a world of difference. A Home Inspection's Role in Fire Prevention I've seen firsthand how crucial it is for homeowners to ensure their properties are safe from fire hazards. During a home inspection, I assess various elements that contribute to fire safety, including:
The Two Most Common Causes of House Fires I have reviewed the data from Halifax Fire and Emergency, and it quickly became clear that the two most common causes of house fires are smoking and electrical issues. Smoking-Related Fires: Smoking is not only hazardous to your health but can also pose a significant fire risk. Carelessly discarded cigarette butts, ashes, or improperly extinguished smoking materials (especially outside the home) can easily ignite flammable materials, leading to devastating fires. To prevent smoking-related fires, it's essential to use designated smoking areas, never smoke in bed, and ensure cigarette butts are extinguished in proper receptacles. Electrical Fires: Electrical fires are a hidden danger that can lurk within our homes. Overloaded outlets, faulty wiring, and malfunctioning appliances can all spark electrical fires. To safeguard against these risks, it's crucial to have regular electrical inspections, avoid overloading outlets, and replace damaged cords or equipment promptly. Maintaining a safe electrical system is vital to protect your home from the devastating consequences of electrical fires. Many electrical fires can be traced to extension cords. These are generally okay for temporary use but are not meant to be used for permanent power. If a home doesn’t have adequate receptacles an electrician can usually help safely add more to a home. Home inspectors and firefighters both share a common belief that the best way to deal with a disaster at home is to prevent it from happening in the first place. One of the primary channels through which I've connected with potential clients (and most likely how you came across my services) is via our company website. While I'm not a professional web developer, I took it upon myself to design and continually enhance our website over time. My aim was to create something more than just your typical bland and generic corporate website; I wanted it to reflect my genuine passion for homes and living in our region, a passion I also share through this very blog. Having visited numerous websites, I must say that home inspectors and professionals in similar industries could greatly benefit from dedicating more time to their online presence. This isn't just about addressing issues related to spelling and grammar; it's also about steering clear of tired and overused cliches that you won't find on my website or social media platforms. Here are a few of these cliches that I frequently come across, along with my personal perspective on them. "I Inspect Each Home as if it Were My Own" While I consider myself a responsible driver, I can't claim to be flawless behind the wheel. I once worked at an auto repair shop, and part of my responsibilities involved driving customer vehicles. I made sure to handle those cars with utmost care for two key reasons: first, I took their trust very seriously, and second, I wasn't as intimately familiar with those cars as I was with my own. Similarly, when it comes to home inspections, I understand that I possess the skills to identify and address most home issues. However, I don't inspect my own home as rigorously because I know it inside out. A home inspection is a one-time event and in a home I don't know the history or layout of ahead of time. As such, I approach it with even greater care and attention than I would my own home. "Your Home is Your Most Important Asset" While this statement holds true for many individuals (including myself), as a home inspector my duty is to deliver the best inspection possible, regardless of my client's circumstances. I've conducted inspections for new homeowners, investors, sellers, and even on behalf of tenants, and if not explicitly informed, I would have no way of knowing the property's intended use. My role is centered on assessing safety and functionality, not making judgments about a home's future purpose. Generic Pictures of Homes Many home inspector websites feature stock photos of immaculate houses in perfectly manicured neighborhoods. However, you won't find such images on my site. All the photos on my website are original, often captured using our drone, and none of them depict specific houses in Nova Scotia. This approach is simple and ethical: I never share any personal information, client or otherwise without written consent, including what the exterior of a home looks like. Additionally, considering the ongoing housing shortage, many homes aren't picture-perfect (I have never come across a home without issues, my own included), and I believe it's important to reflect this reality.  The only stock home photo you will see on our website! Cliche and Keyword Loaded Blogs
I've come across countless blogs that are clearly written solely for the purpose of maximizing search engine visibility, a practice commonly referred to as SEO in the industry. I once encountered a home inspector who used the phrase "your (city) home inspector" a staggering 14 times in a single blog post! My primary goal with this blog, on the other hand, is to share valuable knowledge and insights. If it happens to help someone discover our company, all the better. One of the key objectives I had in mind when I founded my own company was not only to provide top-notch, affordable inspection services characterized by professionalism but also to convey that home inspections and learning about how houses function can be engaging and enjoyable, rather than dull and monotonous. Steering clear of cliches is just one of the ways in which I aim to stand out from the crowd, offering a unique and refreshing approach to this industry. As a professional home inspector, my journey has been shaped not only by my keen eye for detail but also by my proficiency in collecting and analyzing data. This skill, honed through many years of experience, has allowed me to derive valuable information from the reports I generate. In this blog post, I'll delve into how my data-driven approach has transformed my inspections, enabling me to make informed decisions, identify trends, and avoid baseless speculation. Harnessing the Data Advantage In a previous role, I experienced a dramatic reduction in my workload by applying my data analysis knowledge, which also granted me the time to pursue my dream of becoming a home inspector. Armed with the insights I've gained over the years; I now use data to support my instincts and bolster my assessments with hard evidence and facts. This approach allows me to provide more comprehensive and accurate home inspections. Identifying Trends: Examples from the Field Let's take a look at some real-world examples of how data has enhanced my ability to conduct inspections:
By consistently collecting and analyzing data on these aspects, I've gained the ability to quickly assess whether a home's features fall within typical parameters or if there's something unique to investigate further. This approach not only streamlines the inspection process but also motivates me to delve deeper into rarer building materials, expanding my knowledge base. I can use this information to better inform clients on the site during the inspection process. The Limitations of Data While data is a powerful tool in the home inspection arsenal, it's crucial to acknowledge its limitations. Data should not be used as a shortcut to draw conclusions without thorough examination. To illustrate this point, let's consider a non-related example:  Lots of data, all of it useless! Imagine a casino game of roulette where a screen displays data on past spins, such as the percentage of spins landing on red versus black. This data may seem helpful but is entirely irrelevant because, in reality, the odds of the ball landing on a specific number in each spin never change. It's a constant probability as each spin of the wheel is independent of the last. Bringing it Back to Home Inspections In the world of home inspections, data can reveal statistical trends. For instance, I can share that 3-tab shingles are statistically more likely to have problems than architectural shingles (almost solely based on the fact 3-tab are generally much older), which, in turn, are more likely than metal roofs to present issues. However, the real world is filled with surprises. I've seen homes with old shingle roofs that exhibited no leaks and, conversely, brand-new roofs with leaks. Ultimately, while my knowledge of statistics and data helps me identify trends and streamline my work, it is no substitute for the hands-on inspection process. Home inspections demand a thorough, physical examination of each property, leaving no room for shortcuts or assumptions. In the realm of home inspections, the fusion of expert observation and data analysis is a powerful combination. It empowers inspectors like yours truly to make informed assessments, identify trends, and offer valuable insights to clients. Yet, it's essential to remember that data alone cannot replace the meticulous, on-site examination required to ensure a comprehensive evaluation of a property. The art of home inspection lies in striking the right balance between data-driven analysis and the hands-on inspection experience.
During my elementary school years, I had a routine on school days: the bus arrived at around 8:15am so if I wanted to watch a cartoon before school, I had to get up at 7:30am and for years, since I grew up in the 80s with only a handful of channels, the only kid’s show on TV at that timeslot was Inspector Gadget. For those not aware, the show is about a dimwitted cyborg detective who has hundreds of gadgets installed in his body and somehow, someway manages to always save the day despite his ineptness. Did I mention that the show was partially created right here in Halifax as well? No, I am not a dimwitted inspector, but I couldn’t help but notice the parallels to my own set of tools, many used only for obscure situations. Sadly, mine are not built in but today’s blog post covers some of the more common tools I, and most skilled home inspectors, use on most inspections. Let's take a look at these one by one.  Sewer Scope
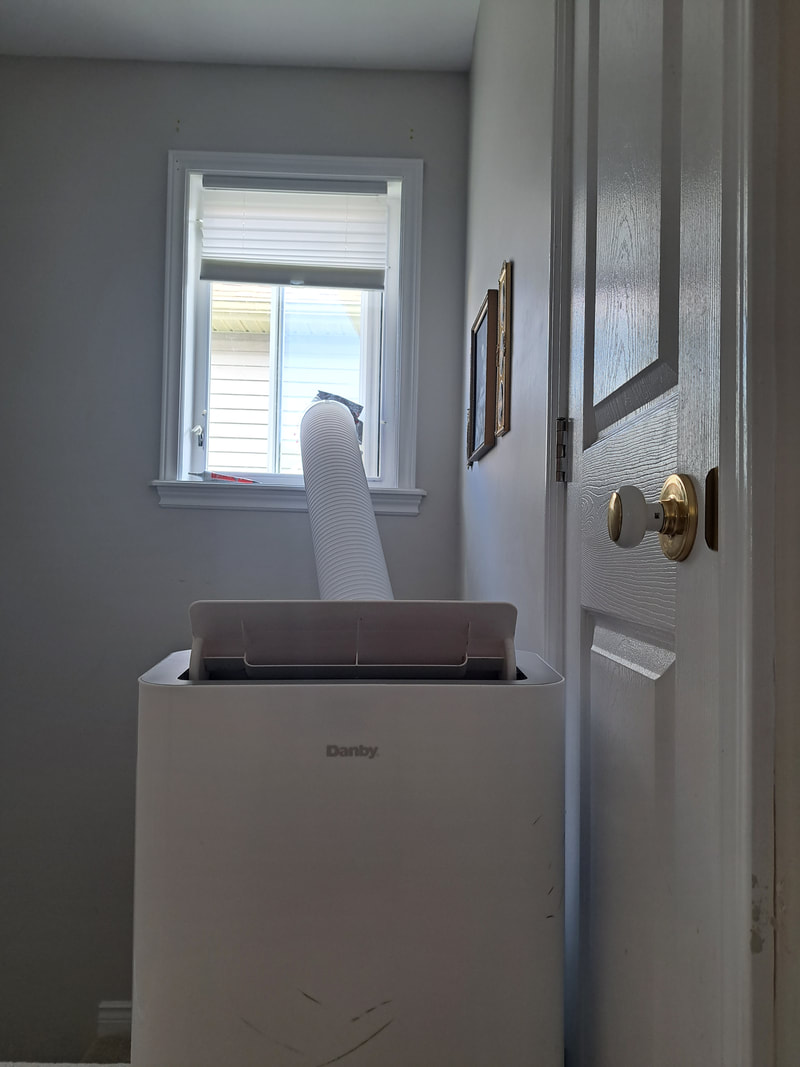
One of my newer tools, I started offering this service late last year. It is a pretty simple setup, with a camera on a very long cord. However, it is a little more complicated to use, and knowing how to avoid getting it stuck in a sewer system is an area I studied very carefully. Thermal Camera The most expensive but also most valuable piece of equipment. While it does not provide X-ray vision it does provide valuable assistance in seeing things the naked eye cannot, usually related to moisture issues or poor insulation. There is a lot to know about how to use a thermal camera properly and they can actually DECREASE the quality of inspections if used improperly. Moisture Meter That tiny little unit in the middle is used for detecting the % of moisture in a particular substance, most notably drywall and wood. In my experience, a cheap unit like this works just as well as an expensive one and all homeowners should pick one up. They should also buy a... Electrical Tester While not 100% reliable, these plug in units can usually tell if an electrical receptacle is properly polarized and grounded. Lately, I have tended to avoid using this until later in the inspection to confirm what I already know through inspecting the main electrical system. Extendable Magnet Not only great for picking up loose screws that drop, another great use of this is to determine if a metal is ferrous (contains iron) or not. Using this on older pipes can also confirm the presence of lead supply lines, although luckily they are relatively rare in Halifax. Drone I remember my very first inspection having to scramble to see the roof due to the home's very tall design. I did manage to rig something together but put a drone on my wish list. I eventually went and added it to my toolkit and wonder how I ever inspected without it. A great tool to not only see onto tall roofs but also to provide valuable aerial shots and look for big picture issues. The bonus is on quiet days like the day I wrote this I can capture some breathtaking natural beauty in ways we have never seen before. 4" Basketball (!?) You might wonder what the point of this is and if I am planning on taking a sports break during inspection. The answer is in the size: 4". My then 2 year old didn't have much interest in this particular ball but I couldn't help but notice it was exactly 4". In other words, a properly installed railing should have balusters no more than 4" apart. No need to pull out a tape measure when this ball does the trick: if it falls through the balusters are too far apart. Of course it goes without saying that the #1 tool is an inspector's senses, particularly their eyes and brain. All the fancy tools in the world are pointless without the skills and knowledge to know when to use them and more importantly when not to. As I sit here writing this blog post, Halifax is yet again experiencing another hot and humid day. Our home, like many others in this region, boasts a design suited for colder climates to keep those pesky heating bills in check. However, the downside to this setup becomes apparent in the months of July and August. While Nova Scotia's climate typically doesn't necessitate air conditioners (A/C), having one makes sleeping at night a breeze. To combat the heat and lower our winter heating bills, we installed a heat pump system, essentially a reversible air conditioner, in our home. Unfortunately, due to some limitations, we couldn't set it up in the bedroom areas, and window units weren't an option either. Therefore, we rely on a portable air conditioner to keep the temperature as comfortable as possible. Though it does help to some extent, let me be clear that these portable units are far from being ideal solutions. I won't delve into technical jargon about the vapour compression cycle and A/C physics to avoid putting you to sleep, hopefully in a cool and air-conditioned space! Now, let's talk about the flaws of portable A/C units. One of the most obvious downsides is their noise level. Unlike typical air conditioners that have their compressors and fans located outside, portable units have all the noise-generating components inside the home, contributing to a less peaceful environment. As with any air conditioning system, a source of air intake is necessary for these portables to function and unfortunately it's the very same air we're desperately trying to cool on the hottest days of the year!
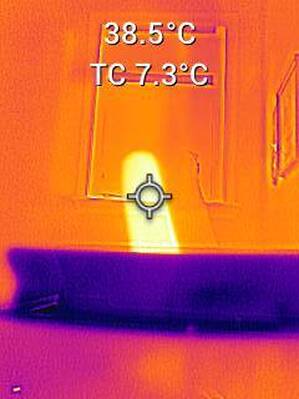
Another issue with portable A/C units is the hot and poorly insulated hose that leads outside when the unit is running. My infrared image reveals that on this particular the A/C hose reached close to 40 degrees on the outside, and unfortunately, some of this warm air returns to the cooled room through radiation. This further reduces the unit's efficiency and adds to your power bills.
Now, the big question: Are these portable A/C units worth the investment? To be honest, even though we still have one ourselves despite having a heat pump system, they are a great value for limited use. However, these units should be your last resort rather than your first. I understand that some households may face limitations in installing window A/C units for various reasons, but if it is a feasible option, they are much more efficient and quieter. Without a doubt, if you have a home that is heated by electricity like ours, your top choice should be a heat pump, preferably a ductless mini split. However, we know it's not always feasible to snap your fingers and have a new system in place instantly. In the meantime, keep in mind that portable A/C units come with their downsides – they are noisy, inefficient, and shouldn't be your primary cooling choice. 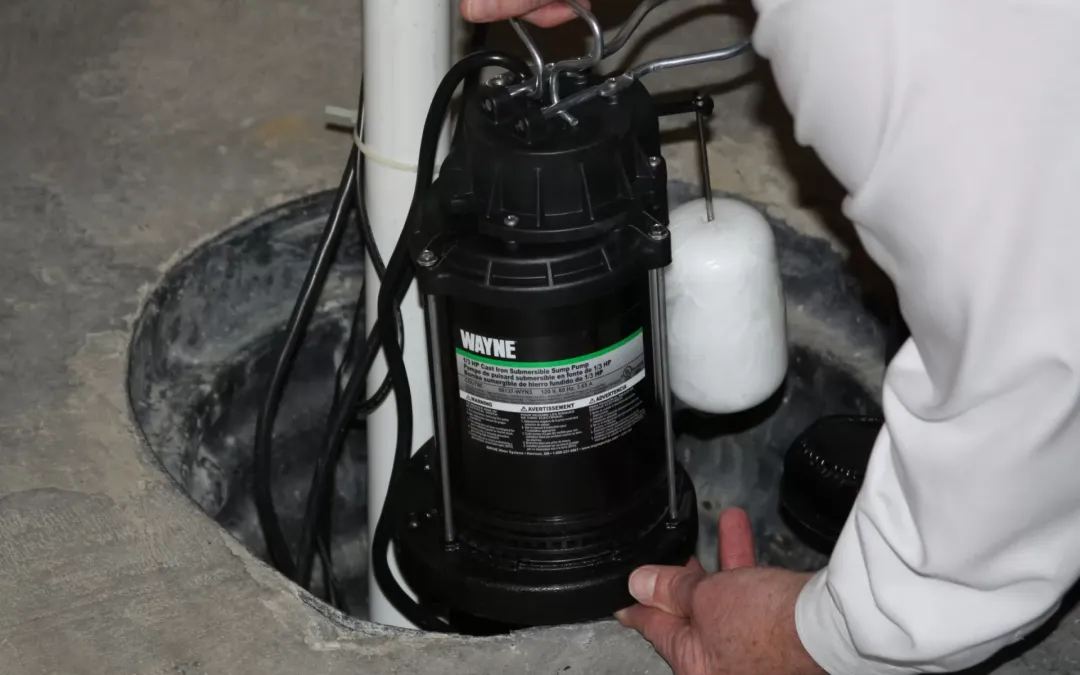 Courtesy of Jason Payne
Valler Home Inspections, Morinville AB. A sump pump and pit system is a crucial component of any home’s waterproofing strategy. It serves to protect your basement or crawl space from flooding, preventing water damage and the growth of mold and mildew. Regular inspection and maintenance are essential to ensure the system functions optimally. Additionally, understanding the source of the water and how the system works can help you appreciate the importance of proper maintenance. In this blog post, we will provide you with a step-by-step guide on inspecting and maintaining your sump pump and pit. We will also explore the significance of installing a water level alarm as a safety measure in case of pump failure. Understanding the Sump Pump and Pit To fully grasp the importance of maintaining your sump pump, it’s essential to understand where the water comes from and how the system works. Water can enter your basement or crawl space due to reasons such as heavy rainfall, melting snow, or groundwater seepage. When the water accumulates around your foundation, it can exert pressure and find its way into your home. That’s where the sump pump and pit come into play. A sump pump is typically installed in a pit, known as a sump basin, which is dug into the lowest part of your basement or crawl space. The pit collects water that accumulates around the foundation. It serves as a reservoir to contain the water until the sump pump activates and pumps it out. The water enters the pit through a drain tile system or through natural water migration from the surrounding soil. The drain tile system, also known as a perimeter drain, consists of perforated pipes installed around the foundation’s perimeter. These pipes collect and redirect water towards the sump pit, preventing it from seeping into your home. Once the water level in the pit rises to a certain point, a float switch or pressure sensor inside the sump pump is triggered, signaling the pump to activate. The pump then removes the water from the pit and redirects it away from your home’s foundation, usually through a discharge pipe that leads to a storm drain, a drainage ditch, or an appropriate area in your yard. Understanding the source of the water and the role of the sump pump and pit will help you appreciate the importance of regular maintenance and inspection to ensure the system’s proper functioning. Regular Visual Inspection: Performing routine visual inspections can help you identify any potential issues with your sump pump. Here’s what you should look for: a. Ensure the sump pit is clear of debris, dirt, and any other obstructions that could hinder the pump’s operation. b. Check the power cord for any signs of damage, such as fraying or exposed wires. Damaged cords should be replaced immediately. c. Inspect the float switch, which triggers the pump to turn on and off. Ensure it moves freely without any obstructions. d. Verify that the check valve, located in the discharge pipe, is functioning correctly. It prevents water from flowing back into the pit once it has been pumped out. Testing the Sump Pump: Regularly testing your sump pump is crucial to ensure its reliability. Here’s how to do it: a. Fill a bucket with water and pour it into the sump pit until the water level rises. b. Observe the float switch’s response, ensuring that the pump activates and begins pumping water out of the pit. c. Allow the pump to run until the water level is significantly reduced. d. Check if the pump shuts off automatically once the water level drops. If it continues to run or doesn’t activate at all, further inspection or repairs may be necessary. Maintenance Tasks: To keep your sump pump in optimal condition, follow these maintenance tasks: a. Clean the sump pit annually, removing any debris, mud, or sediment that may accumulate over time. b. Check the sump pump’s impeller for any debris or clogs. Gently remove any obstructions to ensure proper functionality. c. Inspect the discharge pipe and ensure it is securely attached. Clear any blockages that may obstruct the water flow. d. Test the backup power system (if applicable) to ensure it functions correctly during power outages. Installing a Water Level Alarm Installing a water level alarm is an additional safety measure that can provide early warning in case your sump pump fails or the water level rises too high. It alerts you when the water reaches a certain level, giving you ample time to address the issue before flooding occurs. In conclusion, regular inspection and maintenance of your sump pump system are vital for its reliable performance and to prevent potential water damage. By dedicating time to check and clean the sump pump and pit, testing the system periodically, and considering backup power options, you can ensure that your sump pump functions effectively when needed. Additionally, seeking professional assistance for complex issues or uncertainties can provide further assurance. By implementing these maintenance practices, you can rely on your sump pump to safeguard your basement or crawl space, providing you with peace of mind and protecting your property from the devastating effects of flooding. Wood is a timeless and versatile material that has been used in construction for centuries and is the most common type of residential framing in Nova Scotia by a large margin. From framing to flooring, it brings warmth and beauty to our homes, and nothing beats the smell of wood, at least to this home inspector! However, lurking beneath its appealing surface lies a hidden threat that can compromise the integrity of any structure: rot. It's crucial to understand the damaging effects of rot on wood and the necessity of identifying and addressing it promptly. Wood rot is a natural process caused by fungi that break down the structural components of wood. These fungi thrive in environments with high moisture content and poor ventilation. They feed on the cellulose and lignin within wood, gradually weakening its structural integrity. If left unchecked, rot can spread throughout a building, leading to severe damage, compromised safety, and expensive repairs. Types of Wood Rot There are two primary types of wood rot:
Signs of Wood Rot Detecting wood rot requires a keen eye during home inspections. Look out for the following signs:
Wood rot is a formidable adversary that can compromise the structural integrity and safety of a building. As a home inspector, being knowledgeable about the causes, signs, and impact of wood rot is essential for providing thorough assessments. In the example below, the deck railing was pressure treated (PT) but no treatment was added to the cut area. This lead to moisture infiltration, which is the most essential ingredient to wood rot. 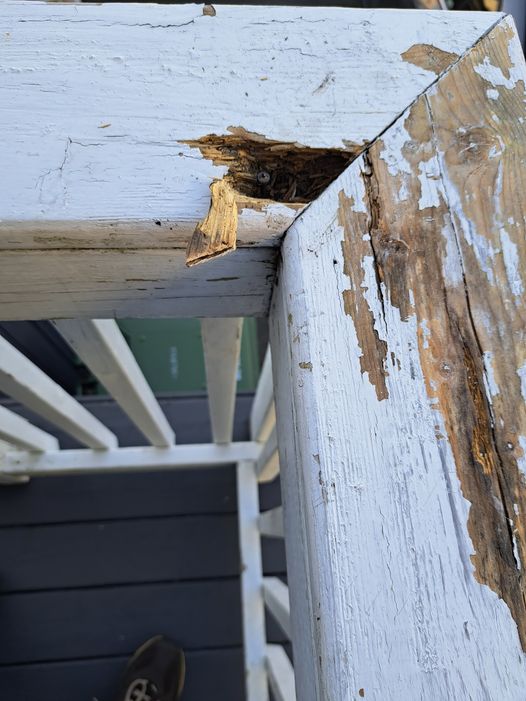 This is an example of "dry" rot, which is anything but. Wood rot is a valuable function of nature, allowing dead wood to decompose and form nutrients for new trees to take root and complete the natural cycle. However, the interests of a homeowner is to slow down this process as much as possible by keeping moisture at bay.
|
Archives
April 2024
Categories
All
|
 RSS Feed

|
Inside Edge Home Inspections Ltd.
Halifax, NS 902-209-9921 info@ieinspections.ca Proudly Serving the HRM & Central Nova Scotia |
|